Keypoints For Robotic Manipulation
15 mins read
This article contains descriptions of:
- How to efficiently generate labels for 3D key-points and instance segmentation ?
- How to learn 3D key-points and instance segmentation ?
- How to use 3D key-points in pick and place / contact rich manipulation tasks ?
Bonus: Also contains details on how to generate labels and learn semantic instance segmentation.
Why learn 3D key points ?
Consider the problem of hanging any mug by handle on a rack. How can we go about solving this task using robotic manipulator ?
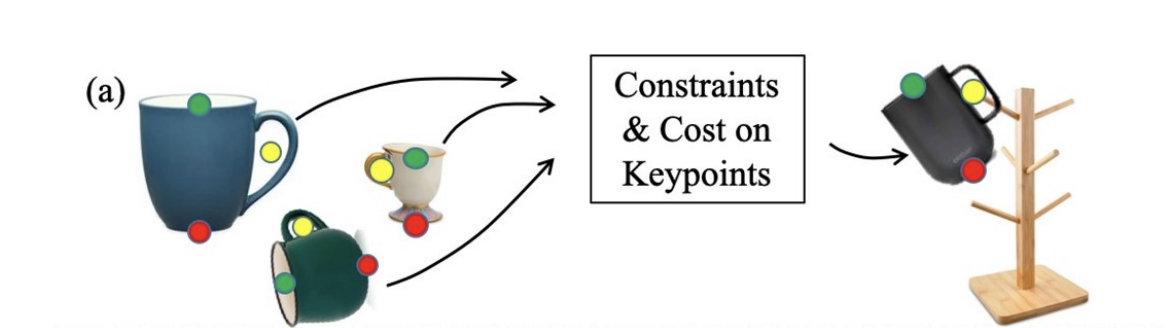
Task of hanging any mug on a rack. Illustration of specifying this task using semantic 3D key points. Notice how yellow key point is at center of handle for different cup variations. PC: k-PAM[5]
There are a few options:
- Demonstration and end-end learning: Collect several examples of hanging a mug on a rack, with different mugs / different back grounds / different initial conditions etc. and use Imitation Learning or Inverse RL to train the policy. but what’s a good input representation for this policy ? Although, there are some impressive demos of using raw sensor data (RGB / RGBD) as input to the policy, you could most likely benefit by using some intermediate state representation in terms of sample efficiency.
- State estimation and planning: You could choose to estimate the state of the cup and use an optimization based planner to get the cup to target state. One caveat is that this is NOT a feedback policy and we’ll see how k-PAM 2.0 extends this idea to a feedback policy based on 3d key-points.
In both cases, we need (or benefit from) object state, and we will focus on literature that use 3D key-points as this intermediate representation.
Specifying the state based on 3D target object poses is common practice, however this fails to generalize to all cups with different sizes and holder shapes as illustrated below:
Task specification is more robust for category of objects like mugs when using semantic 3D key points. PC: k-PAM[5]
Also, we will see with k-PAM 2.0 how these key-points are used for feedback control in contact rich manipulation such as peg in hole insertion / usb insertion / wiping the white board etc.
Using 3D key-points as intermediate state comes at the cost of a key-point detector. Lets first discuss how to efficiently (in terms of human time)generate these 3D key-point labels and how to train a 3D key point detector.
How to get 3D key point labels ?
(and instance segmentation labels)
LabelFusion exploits 3D dense reconstruction of the scene to generate segmentation masks and object poses. A known object mesh is aligned to 3D constructed scene first by using human labelled manual registration and then refined further by ICP (Iterative Closest Point) algorithm. Since the camera poses of scene is also estimated by 3D dense reconstruction algorithm, label fusion uses these camera poses to label the object masks and object pose for each frame in the scene. The process is illustrated below:

Label fusion for segmentation masks. PC: LabelFusion [1]
The same idea of using the 3D reconstruction to label 3D key-points on an object mesh and transforming these labels to each camera pose can be used to generate the 3D key-point labels for each depth images illustrated below. Also notice that this doesn’t necessarily need pre-built 3D meshes.
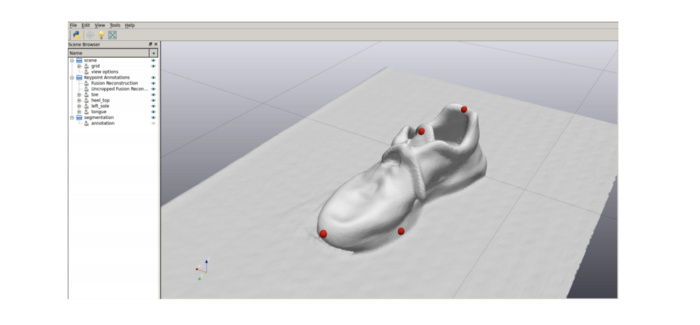
3D Key-point annotation on 3D reconstruction. PC: k-PAM [5]
The advantage of labelling on 3D reconstruction and projecting to each frame makes for efficient use of annotators time. As illustrated below for objects segmentation this is almost 10k time more efficient than per frame labelling. LabelFusion collects segmentation scenes in different backgrounds and multi-object scenes and the diagram below shows the total time of label generation per scene.
The authors were able to generate 1 million+ segmentation labels in a few days (without crowdsourcing) and 100k+ 3D key-point labels with few hours of annotation time.
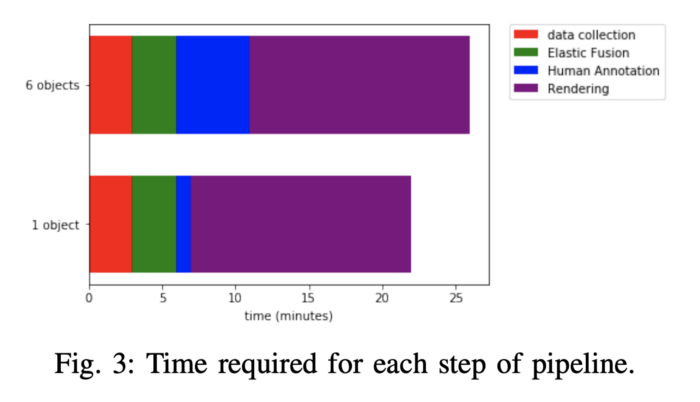
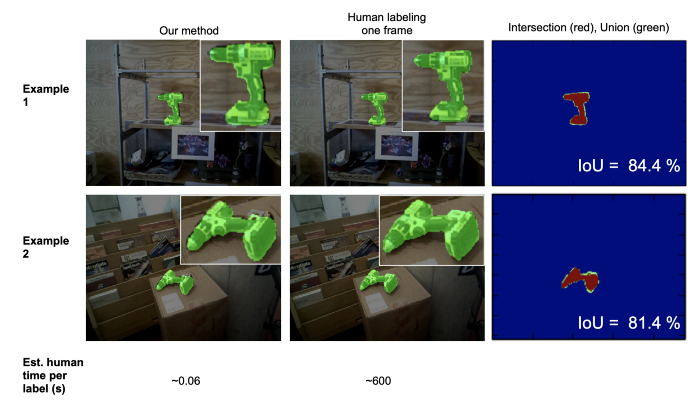
Labelling using LabelFusion strategy is almost 4 orders of magnitude efficient. PC: LabelFusion
How to learn 3D key points ?
(and panoptic segmentation)
First, let’s understand how panoptic segmentation works and later we’ll see how that is extended for 3D key-points detection.
Panoptic segmentation combines two types of segmentations:
- Semantic segmentation: To tell different objects types apart, eg: mugs vs plates vs background.
- Instance segmentation: To tell different instances of object apart, eg: different plates in a pile of plates.
Illustration of panoptic segmentation architecture:
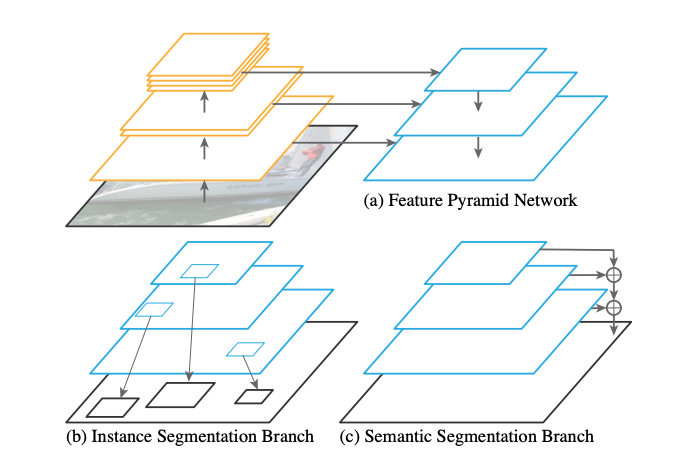
PC: Panoptic FPN [4]
Feature Pyramid Network (FPN): The FPN is used to extract rich multi-scale features which is then used for segmentation tasks.
Semantic Segmentation: For semantic segmentation, the combined multi-scale feature map from FPN is upsampled (c) to input image size and for each original pixel a class is predicted. Per pixel cross entropy loss w.r.t ground truth segmentation is used for training.
Instance Segmentation: The shared FPN features are used to propose ROI (Regions of Interest → Bounding boxes that correspond to foreground object irrespective of the class eg: all soccer kids and the ball as shown below.).

Overview of Mask-RCNN for instance segmentation. [2]
For each predicted ROI bounding box, the corresponding FPN feature is extracted using RoIAlign operator (Bilinear sampling of FPN features per ROI), these RoI features are used to perform:
- Classification: Each RoI must correspond to one of the foreground classes or background Eg: soccer player vs ball vs background.
- Bounding box refinement: A tighter bounding box around each object for more accurate detection.
- Instance mask prediction: A separate FCN (Fully Convolutional Network), predicts object masks for each object type independently (using sigmoid) and the mask corresponding to the foreground class is used as the instance mask.
Learning 2D key points using Mask-RCNN
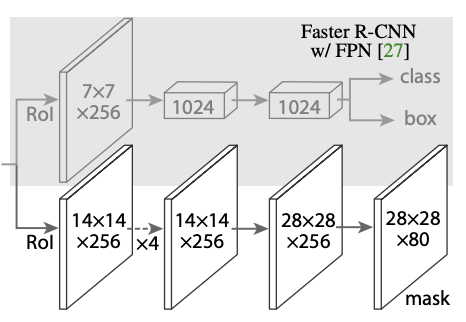
Adding Instance Mask to Faster R-CNN with FPN. PC: Mask-RCNN [3]
Key-point prediction: For each RoI feature, another mask branch is added and the output channels correspond to each of K key-points. The visible 2D key-point is encoded as heat map across the m² region. Soft-max loss over each m² region is used for training the key-point detector.
The example below shows 2D instance segmentation and human joint key-points predicted by mask-RCNN.
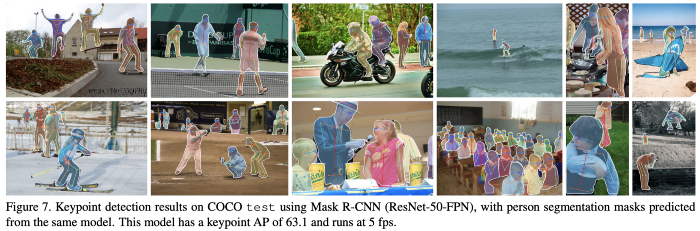
Instance segmentation and key-points detected by the same Mask-RCNN PC: Mask-RCNN [3]
Learning 3D key points
For 3D key-point detection, in addition to 2D key-points described above we also need to predict depth of each key-point and need to accurately predict the occluded key-points as well.
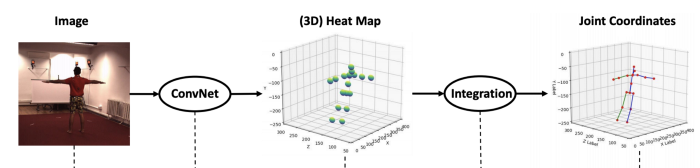
3D Key-Point Regression. PC: Integral human pose [4]
Integral human pose uses expectation (integration) over the predicted heat map instead of taking the maximal index after soft-max to make the key-point detection loss differentiable.
For each ROI, a 2D spatial key-point location as heat-map g_i(u, v) and depth d_i(u, v) are predicted, where u, v are in image coordinates. Notice, that we will regress all key-points irrespective of the occlusions.
Since most of robotic manipulation systems include RGBD images, the depth regression part is much easier compared to RGB only. 3D Key-points in the image fame is computed by taking expectation over the spatial heat-map. These key-point are transformed to world frame using known camera intrinsic and camera extrinsic.
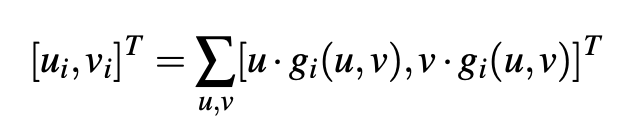
Estimating the image coordinates [u, v] for each 3D key-point. PC: k-PAM
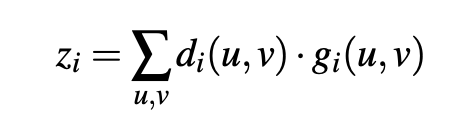
Estimating the depth of each 3D key-point. PC: k-PAM
Example instance mask prediction and 3D key-points predicted by k-PAM 1.0 for mugs.
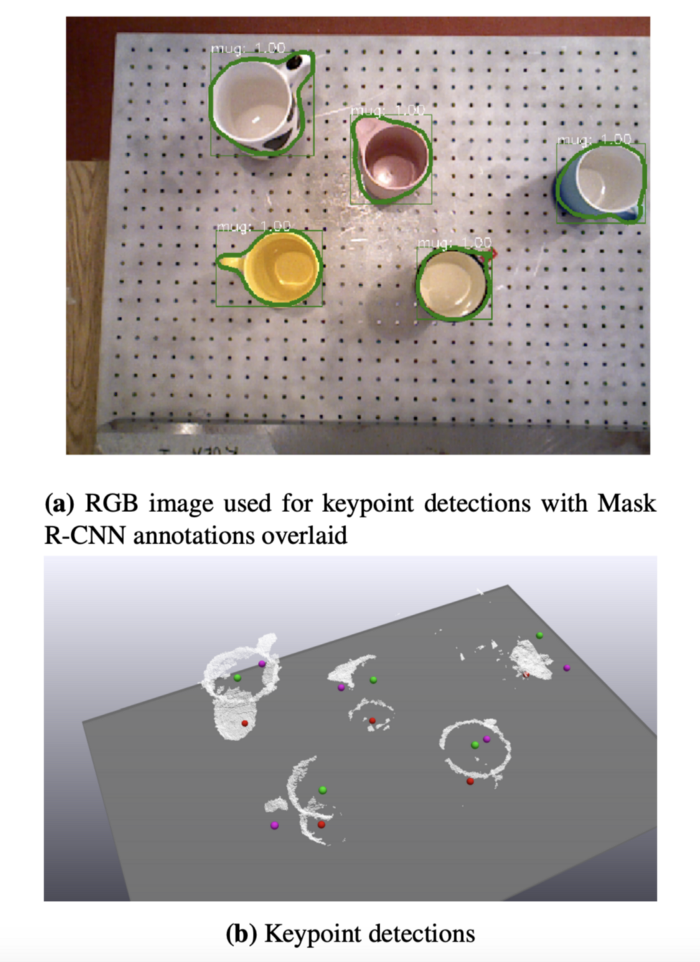
Instance segmentation and 3D key points from Integral Human Pose style key-point detector. k-PAM [5]
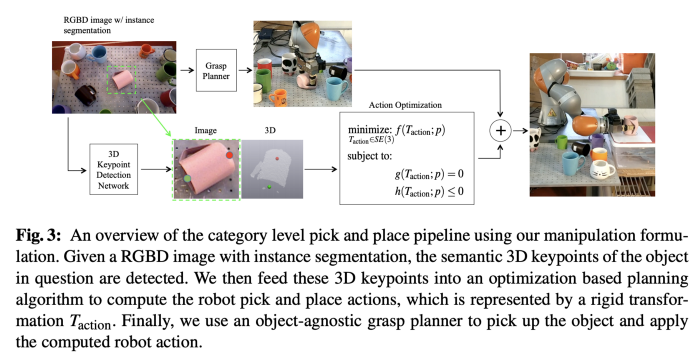
How to use 3D key points for manipulation ?
We’ll see a few ways of utilizing 3D key-points based representations in manipulation pipelines:
- To specify pick and place tasks on a category of objects.
- To perform feedback control for contact rich manipulation tasks on a category of objects.
The common theme in the following work is that preselected 3D key-points are used as object representation and they can be detected on a large number of objects with significant variations in shape / color using the methods described above.
k-PAM 1.0
k-PAM uses the semantic key-points for pick and place application where the target pose of the object matters such as mug placed upright on a tabletop for ANY mug.
PC: k-PAM [5]
3D semantic key-points are used in two ways in k-PAM pipeline:
Specifying the grasp points
Since there are many regions on the object that are graspable, key points can be used to specify which regions to try and grasp. There are a large number of ways ( millions ) of ways to grasp an object and this is multi-modal (i.e many regions could result in similar grasp stability), trying to narrow the regions to grasp for a category of objects could actually simplify the problem for grasp planner. But in addition to grasp point, the local dense geometry & collisions needs to be taken into account for grasp planning.
Specifying the targets
First lets see how to specify the pick and place task with key-points using an example of keeping the mug upright:
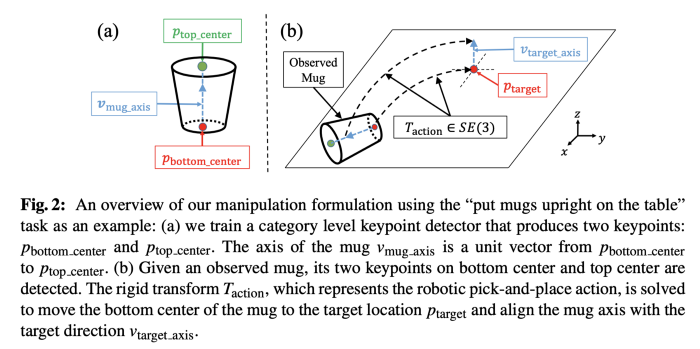
Illustration of how to specify placing the cup upright task. k-PAM [5]
- Upright constraint was specified as below:
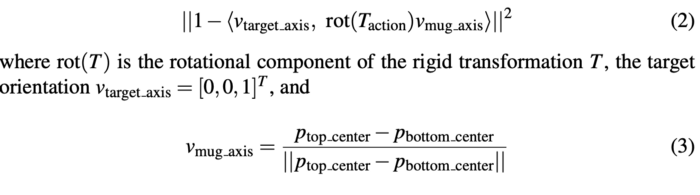
If we grasp the mug in the observed position and the grasp is tight, keeping the mug upright can be specified as transforming key-points p_i from their observed position p_i to their target position T_{action} * p_i. So the entire pick and place can be specified using a rigid transform T_{action} on the 3D semantic key-points on a category of objects.
In general, costs and constraints can be specified as T_{action} being decision variables of following optimization problem.
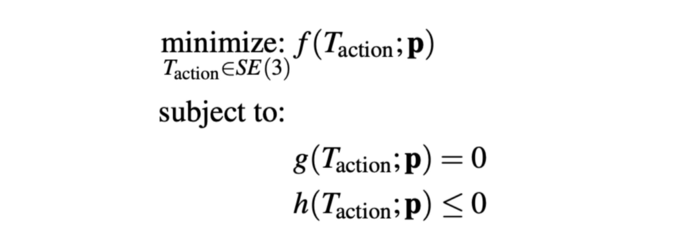
General k-PAM optimization. k-PAM [5]
Here are some example costs and constraints:
- L2 distance cost on key-points.

- Half-plane constraint on key-points (eg: mug / show should be above the table).

n_{plane} and b_{plane} specify the half-plane.
- Point to plane distance cost.

n_{plane} and b_{plane} specify the plane.
- T_{action} should be within the robot reachability and avoid collisions. This is common constraint across all tasks performed in k-PAM 1.0
Let’s use these costs and constraints to understand how following tasks were specified using key-points on shoes and mugs:
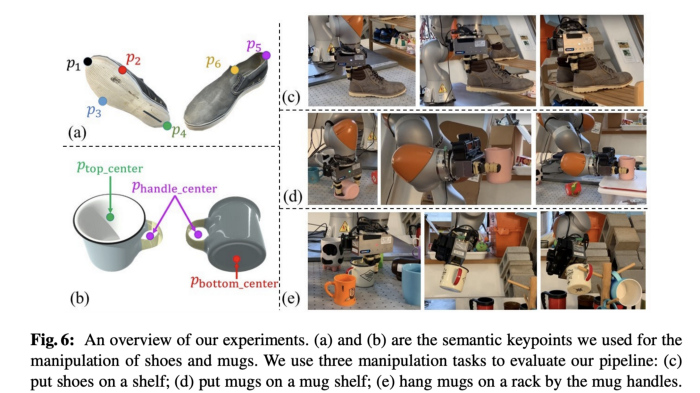
PC: k-PAM [5]
Shoes on rack: The following costs and constraints were used for pick and place the shoe on rack:
- L2 distance cost on shoe key-points p1, p2, p3, p4 to their target position on the rack.
- Point to plane cost on p2, p3 and p4 to the resting plane on the rack since the sole needs to be resting on the rack.
- Half-plane constraint on all key-points for non-penetration.
In addition, the shoe is grasped around the key-point p5.
Mugs on shelf: The following costs and constraints were used for pick and place of mug on shelf.
- L2 constraint (instead of cost) on all key points to target position.
- Upright constraint on the key-points p_{top_center} and p_{bottom_center}.
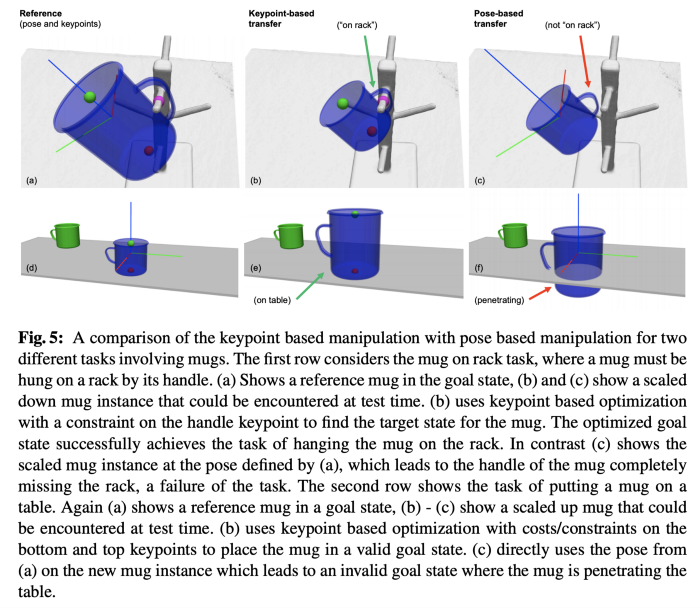
Mugs on rack: The following costs and constraints were used for hanging the mug by handle on a rack. To avoid the collision between mug and rack, T_{approach} was offset from T_{action} along the rack axis.
- L2 constraint p_{handle_center} to target position on rack handle.
- L2 cost on p_{top_center} & p_{bottom_center} to their nominal position.
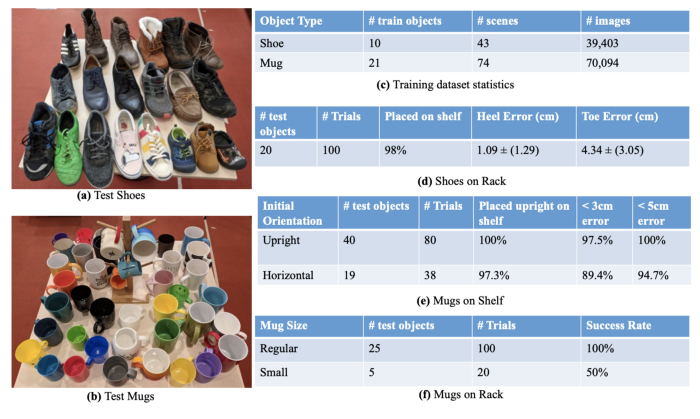
The table below shows the success rate of various tasks specified using the above key-point based representation:
Time lapse video of keeping different mugs on rack. PC: k-PAM [5]
Feedback control for contact rich tasks
k-PAM 2.0
k-PAM 2.0 extends the k-PAM 1.0 to perform contact rich manipulation tasks illustrated below by adding a feedback controller on the detected key-points.
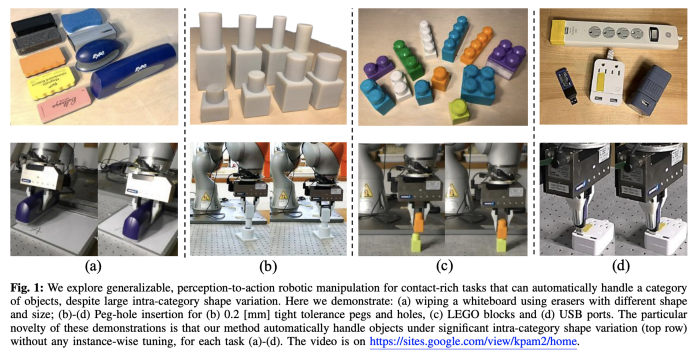
Overview of the tasks solved by k-PAM 2.0 [7]
In addition, it requires the same feedback controller to work not only when there is significant intra category shape variation, but also when the grasps are different. This requirement is satisfied by adding orientation to key-points. The main motivation for using the key-point poses as opposed to global pose is that 3D key-point poses are local co-ordinate representation of the object geometry that’s relevant to the tasks and ignores other geometrics variations in the category such as size and shape of USB sticks on top.
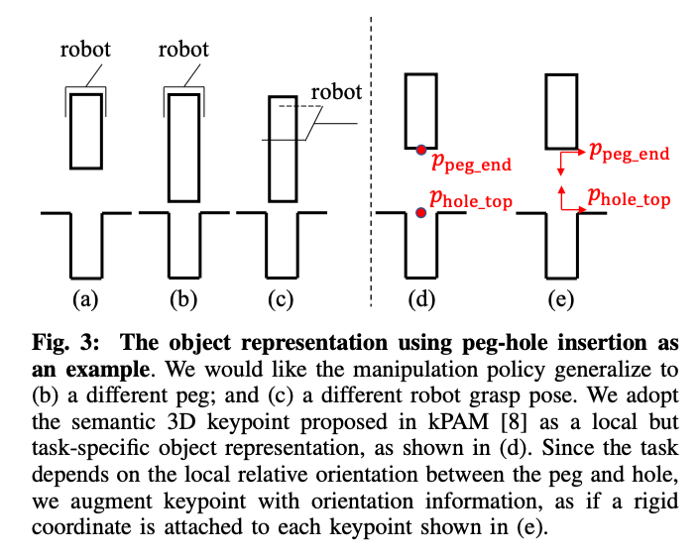
Need for oriented key-points in k-PAM 2.0
k-PAM 1.0 was used to place the peg in the initial condition before the closed loop policy was executed for peg insertion.
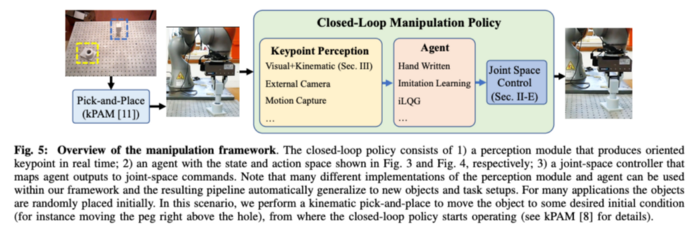
Overview of k-PAM 2.0
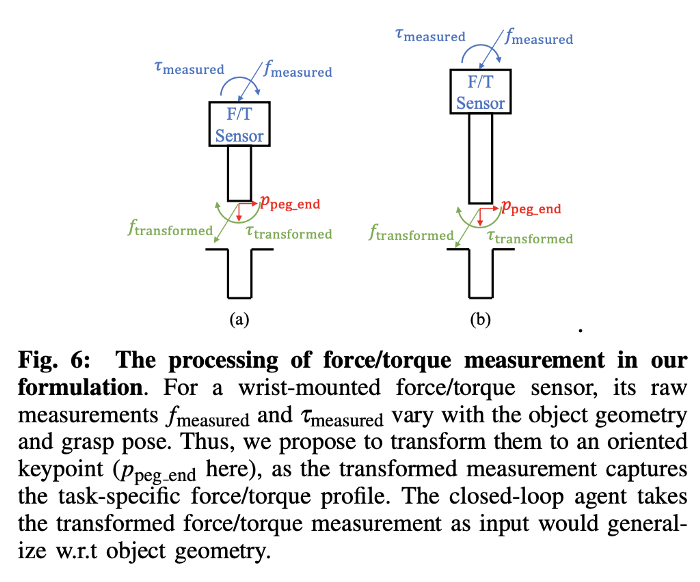
k-PAM 2.0 assumes a manipulator with force / torque sensing at the end-effector. Which is then used to compute the force and torque at the key-point which is used as input to the feedback agent. Since the 3D oriented key-point detector already provides the transform from gripper to the key-point and object is assumed to be static w.r.t gripper, forward kinematics is used to track the key-point in real-time.
Input to the feedback control policy of k-PAM 2.0
The agent outputs the desired linear and angular velocity as shown below, which is then used generate the joint velocity commands using the 3D oriented key-point Jacobian :
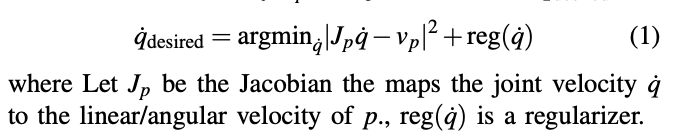
Joint space velocity commands from key-point commands.
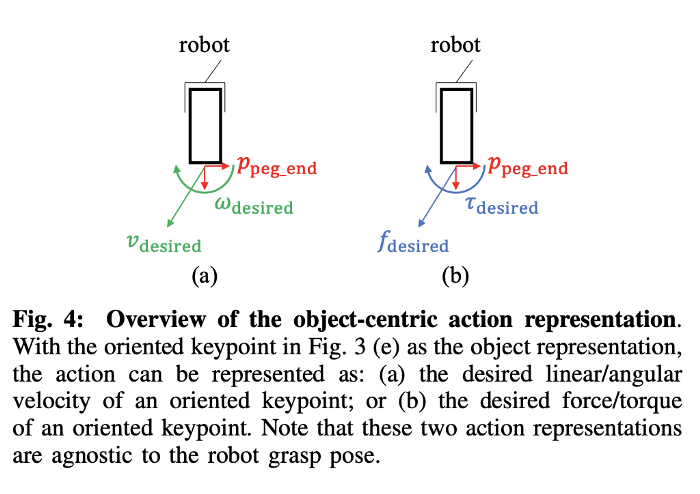
Output of the feedback control policy of k-PAM 2.0
The feedback control policy based on 3D oriented key-points significantly out performs the open-loop policy as shown in Table I and pose based policy as shown in Table II
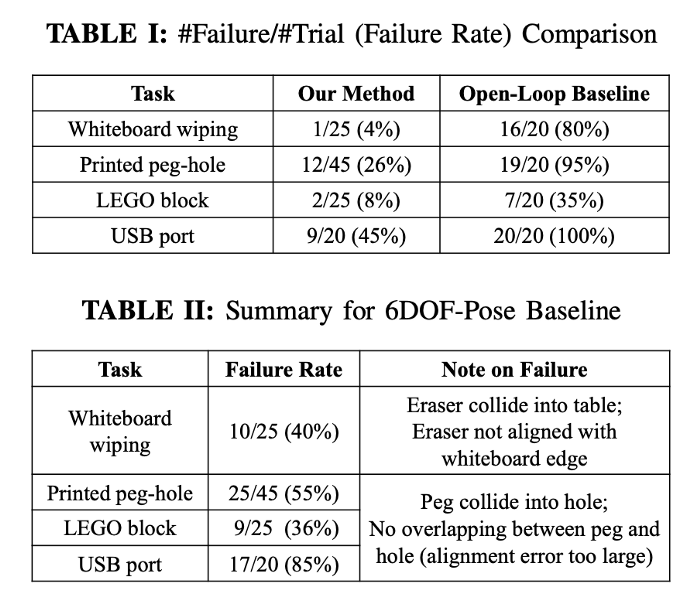
Results of real world robot experiments compared to Open-Loop baseline and 6 DOF representation.
Conclusion:
We have very good perception systems that can detect 3D key-points on objects with significant intra-category shape and visual variations and methods like k-PAM / k-PAM 2.0 can offload these inter-category complexity of the task to a robust perception system and specify the task / feedback control policy on top to accomplish some fairly non-trivial real world manipulation tasks.
References
[1] LabelFusion: A Pipeline for Generating Ground Truth Labels for Real RGBD Data of Cluttered Scenes.
[2] Faster R-CNN
[3] Mask-RCNN
[4] Panoptic Feature Pyramid Networks
[4] Integral Human Pose Regression
[5] kPAM: KeyPoint Affordances for Category-Level Robotic Manipulation
[6] kPAM-SC: Generalizable Manipulation Planning using KeyPoint Affordance and Shape Completion
[7] kPAM 2.0: Feedback Control for Category-Level Robotic Manipulation
[8] Key-points into the future: Self-supervised correspondence in Model based RL